Introduction
The feature to directly import from “Create from Azure Resource(Logic App)” is not available for workflows in Logic App (Standard) yet.
However, the workflows can be put behind in APIM manually, just need to understand bit of it's semantics.
Below we will see how to do it with an example.
But before that why should we add Logic app in APIM?
There are many benefits to using APIM in front of Logic Apps. Here are some of the key benefits:
Security: APIM provides a number of features to help protect and secure APIs, including API key management, OAuth 2.0 authentication, and rate limiting. This can help to protect your Logic Apps from unauthorized access and misuse.
Scalability: APIM can help to scale your Logic Apps by providing a single point of entry for all requests. This can help to improve performance and reliability.
Manageability: APIM provides a number of features to help you manage your Logic Apps, including API documentation, analytics, and alerts. This can help you to track usage, identify problems, and make informed decisions about your Logic Apps.
Abstraction: APIM can help to abstract the implementation details of your Logic Apps from your consumers. This can make it easier to consume your Logic Apps and can also help to protect your intellectual property.
Transformation: APIM can be used to transform the data that is passed between your Logic Apps and your consumers. This can be useful for a variety of purposes, such as converting data formats or adding security headers.
Here are some additional benefits of using APIM in front of Logic Apps:
Caching: APIM can be used to cache API responses, which can improve performance.
Monitoring: APIM provides analytics and monitoring features that can help you track the usage and performance of your Logic Apps.
Logging: APIM can be used to log API requests and responses, which can help you troubleshoot problems.
Versioning: APIM can be used to version your APIs, which can help you to manage changes to your Logic Apps.
Creating a solution
For the sake of walkthrough,
i. Create a Logic app standard with two workflows in it
ii. Create API in APIM - which represent Logic APP and configure the workflows as operations in the API
1. Create Logic app standard and add multiple workflows in it
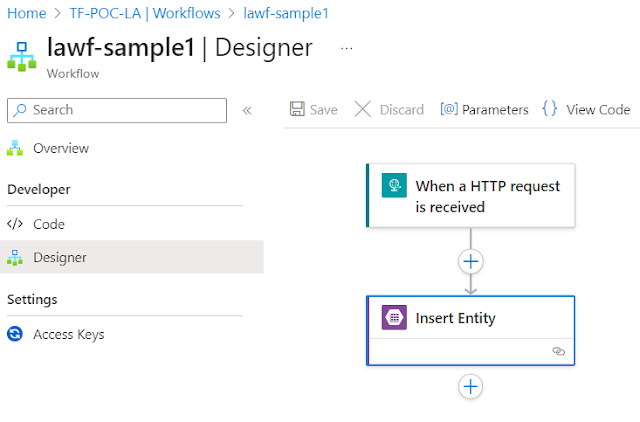
Create a logic app (Standard) and add two workflow
Workflow 1- Http trigger based Workflow to insert entity in Azure Table. Save it and capture the url.Workflow 2- Http trigger based Workflow to update entity in Azure Table
Save it and capture the url.
Following are the url's which we will use in next step
wf1 url - https://tf-poc-la.azurewebsites.net:443/api/lawf-sample1/triggers/When_a_HTTP_request_is_received/invoke?api-version=2022-05-01&sp=%2Ftriggers%2FWhen_a_HTTP_request_is_received%2Frun&sv=1.0&sig=gr-bCDsemB9Rrup1IHlaOq4Ye7ca8QnOVZHVgzcPCGo
wf2 url - https://tf-poc-la.azurewebsites.net:443/api/lawf-sample2/triggers/When_a_HTTP_request_is_received/invoke?api-version=2022-05-01&sp=%2Ftriggers%2FWhen_a_HTTP_request_is_received%2Frun&sv=1.0&sig=yVqTI7OjlS-DXea0axI9gXlrCTPKISTJT6YIuuMSkus
Highlighted in yellow is the base url of workflows and rest is the relative url.
Good to know about Base and relative url before we proceed
A base URL is the first part of a URL that identifies the protocol and domain name of a website. It is used as a reference point for all other URLs on the website.
For example, if the base URL of a website is https://www.example.com/, then all other URLs on that website will begin with https://www.example.com/.
A relative URL is a URL that only contains the path to a resource but not the domain name or protocol. It is used to link to resources within the same website.
For example, if you are on the page https://www.example.com/products/, and you want to link to the page https://www.example.com/products/shoes/, you can use a relative URL like /products/shoes/ instead of an absolute URL like https://www.example.com/products/shoes/.
2. Create API in APIM and add operations in it
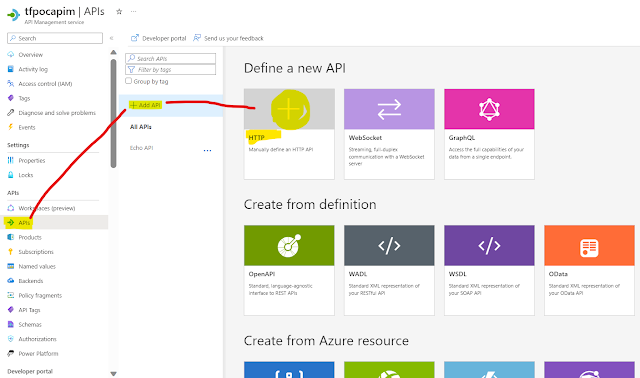
First step is to Add an API, select HTTP - which lets us manually define Http api
Provide Name and API URL suffix(optional), this will form the base url of the API
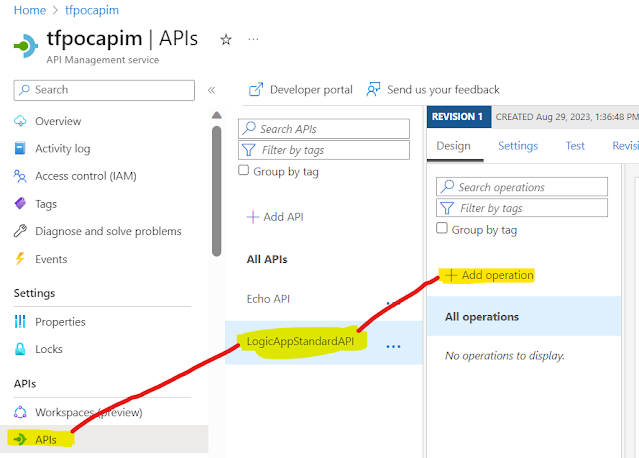
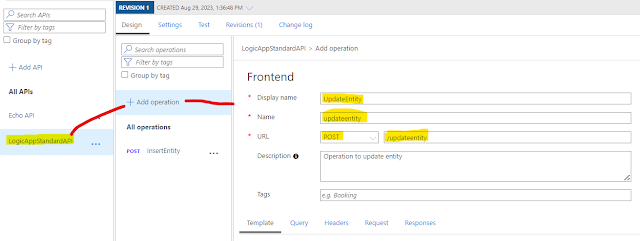
Next, we add two operations
First operation - InsertEntity
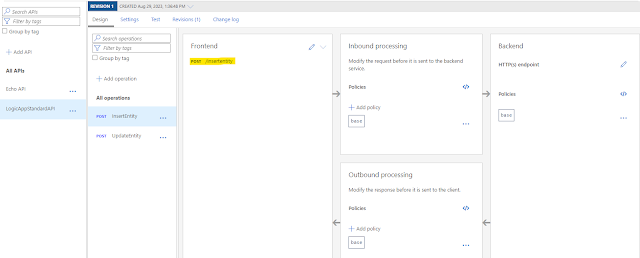
Give a Name , select method as Post and against URL give name which depicts the purpose, like here /insertentitySecond operation - UpdateEntity
Give a Name , select method as Post and against URL give name which depicts the purpose, like here /insertentity
Now API is created with two operations(Only Frontend configured till now).
Next we configure the backend - via policy
I encountered an error while doing so, read about it - https://www.tech-findings.com/2023/09/Error-while-adding-logic-app-standard-workflow-as-operation-in-Azure-APIM.html
We make use of two policy - one to set BaseUrl of Backend and another to set relative url
Add policies in InsertEntity operation
Add policies in updateEntity operation
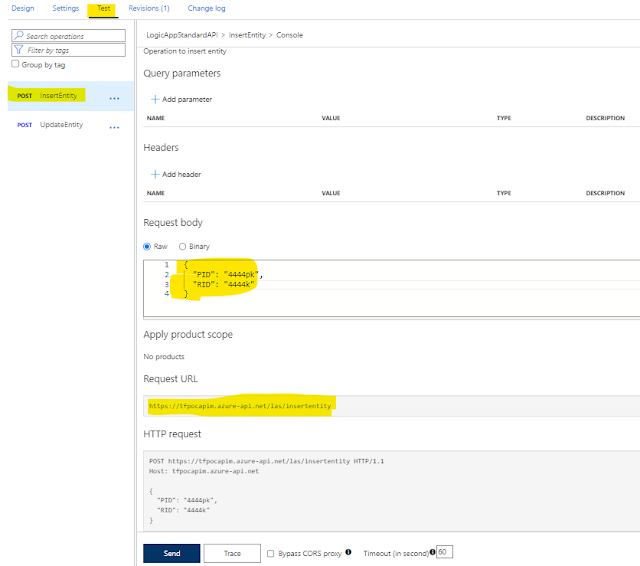
That's it, save it and test the solution.
Testing
How it works
Learn More about Logic App
- Developing Logic app standard workflow which uses Map locally and deploying to Azure
- Developing Logic App Standard Workflow Using Visual Studio Code | Create Logic App Standard Workflow Using Visual Studio Code
- Logic App - Xml to Json using Liquid Map | Append in Liquid Map
- How to use Azure Event Grid Custom Topic | Publishing and Subscribing from Azure Event Grid Custom Topic using Logic App
- Using Azure Storage Account Table as Config Store for Logic Apps | How to read and write from Logic App to Azure Storage Account Table
- Get Logic App Name in Logic App
- Difference between Logic App Consumption and Logic App Standard
- Getting Started with Logic App Standard | Overview of Logic App Standard | Basics of Logic App Standard
- How to find count of Logic App executions using Azure Portal
- Azure Functions vs Azure Logic App | Difference between Azure Functions and Azure Logic App
- Getting started with Logic App : Liquid Map | Using Liquid template in Logic app
- How to get actual error message of Scope in Logic App | Exception Handling in Logic app
- Interview questions and answers on Logic Apps | Interview questions for azure logic app developers
- How to execute Stored Procedure in Logic App | How to connect to SQL in Logic App
- How to get current date in logic app | How to format date time in Logic App
- BizTalk Developer getting started with Logic App
- Getting Started with Logic Apps - Fundamentals
- Getting Started with Logic Apps - Enterprise Application Integration
- Getting Started with Logic Apps - AS2
- Getting Started with Logic Apps - EDI X12 Fundamentals
- Getting Started with Logic Apps - XML to EDI X12
- Getting Started with Logic Apps - EDI X12 to XML
- Getting Started with Logic Apps - What happened to the Request?
- Inserting Multiple Records In On Prem SQL Using Logic App
- Inserting data in On Premises SQL Database using Logic Apps
- Installing and Configuring On Premises Data Gateway - By adding user to Active Directory
- XML Batching(Aggregation) in Logic App
- Batching(Aggregating) messages in Logic App
- Debatching(Splitting) JSON Message in Logic Apps - ForEach and SplitOn
- Debatching(Splitting) XML Message in Logic Apps - ForEach and SplitOn
- Securing Logic App with Azure Active Directory authentication
- Removing ns0: prefix from xml output from BizTalk/Logic app XSLT map
- Using Managed Identity in Logic Apps for Calling Active Directory Secured Function App
- Logic Apps : Fetching ISA and GS Segment Values From Interchange Envelope and Mapping
- Logic Apps : For Each Inside a For Each - Fetching values from field in an array inside an array
