{tocify} $title={Table of Contents}
Requirement is to route the Trip related details which is received in csv format from sales department in a folder to destination folder but in XML format which is expected by downstream system.
Unlike BizTalk which provides us platform to create the artifacts needed (schemas, maps, pipelines etc) which can be orchestrated or used in work flow, logic app is platform for only designing/orchestrating workflow around the services available (using Trigger, Connectors, Azure functions etc.).
Microsoft
Azure Logic Apps Enterprise Integration Tools for Visual Studio 2015 2.0
Note: Only xslt file is supported as of now, .btm is not supported. Read The provided map definition is not valid
Note: Make sure your integration account and logic app are in the same Azure location before you begin.
That's it, final workflow is as below, save it and test.
For testing I generated an instance from flat file and update the values in it, and saved it in the IN folder
And in Out folder I can see the output

Introduction
In last post we saw, how to do file routing using LogicApps. But in real world, Enterprise Application Integration have more than just
routing – Messaging Solution or some
kind of Business Process Automation(It
can be simple or complex in nature).
Messaging solution basically revolves around VETER, it can
be either combination of all or few of them. In Logic Apps we have XML
Validation to validate, Transform XML to do transformation, xpath can be used
to extract xml and to Enrich(compose new message) and route we have connectors available.
In this post we will see with an example, how to validate, transform
and route using Logic App.
Scenario
Requirement is to route the Trip related details which is received in csv format from sales department in a folder to destination folder but in XML format which is expected by downstream system.
In order to implement this solution In logic app, we need to
have schemas related to csv and xml , and a map doing a transformation from csv
to xml.
Unlike BizTalk which provides us platform to create the artifacts needed (schemas, maps, pipelines etc) which can be orchestrated or used in work flow, logic app is platform for only designing/orchestrating workflow around the services available (using Trigger, Connectors, Azure functions etc.).
Although we can design Logic app using browser, we don’t
have provision to create schema or map using browser but they can be used in
workflow if available to it.
To make this availability possible– Integration Account is introduced which
is part of Enterprise Integration Pack,
which acts as a container having capability to store Schemas, Map, Certificates,
Trading Partners, and Agreements. And to deal with the creation of Schemas and
Maps there is SDK provided, It can be downloaded from below link
Microsoft
Azure Logic Apps Enterprise Integration Tools for Visual Studio 2015 2.0
Note: If you already
have BizTalk env, then you don’t need to download the SDK, the schemas and maps
created in BizTalk application are absolutely compatible. Also note that extension for visual studio version above 2015 is not yet available as extension are part of BizTalk and BizTalk 2016 is the last released version. Once latest version of BizTalk is out, respective extension for visual studio will also be made available.
Once you have schemas and maps created, using either of the
above ways – those can be uploaded to the Integration
account. Later this Integration account has to be linked to Logic App, in
order to use the artifacts.
Steps in creating solution
For demonstration, I have used folder as source and
destination which is on-premises. In real world scenario it can be anything - source/destination can be on prem or in cloud.
Creating schemas and map
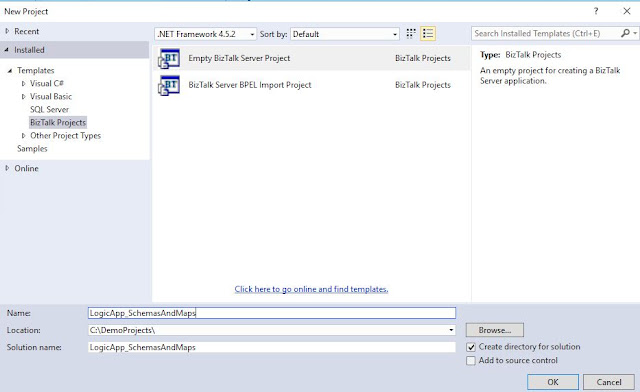
As am using BizTalk for creating
schemas and map, I create BizTalk project whereas if you are using SDK, you
would be creating Integration project(this template gets added to visual studio
when SDk is installed.
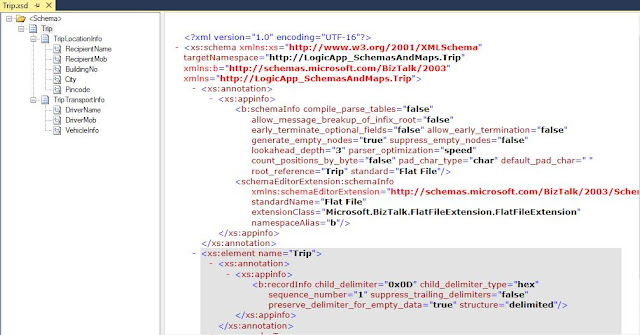
Create one flat file schema-Trip.xsd .Its extension is xsd as the representation of flat file is in xml but with the help of FlatFileExtension class all properties related to flat file are made available.
and one xml based schema - Trip_Xml.xsd
Now create a Map with Flat file schema as source
and Xml schema as destination, mapping is one to one, expect have concatenated
the address.
One more step, before we move ahead is to save the xslt generated from above map. Right click Map-->Validate Map. In output pane, you will see the path of stored XSLT, copy the file and save it in your current project folder.
Creating Integration Account, Uploading schemas and maps
Login to Azure portal and click on new
button, search for Integration Account. Provide the name, resource group, Pricing , Location and click on create.
There are two options in Pricing Tier 1. Free and 2.
Standard, would recommend to use Free as you are able to create a maximum of one account per region and store up to 10 Agreements and 25 maps. Schemas, certificates, and partners have no limits and you can upload as many as you need.
Now to upload the schemas, select the above created Integration Account-->click on schemas on left pane--> click on Add button --> provide name --> browse to folder having the schema of interest--> click ok
and to upload the map,select the above created Integration Account-->click on Maps on left pane--> click on Add button --> provide name --> browse to folder having the map of interest(choose the xslt file we saved earlier)--> click ok
Note: Only xslt file is supported as of now, .btm is not supported. Read The provided map definition is not valid
Creating Logic App
Note: Make sure your integration account and logic app are in the same Azure location before you begin.
Now on Azure portal click New and
search for Logic App, select the blank Template.Provide the name, region, resource
group etc.
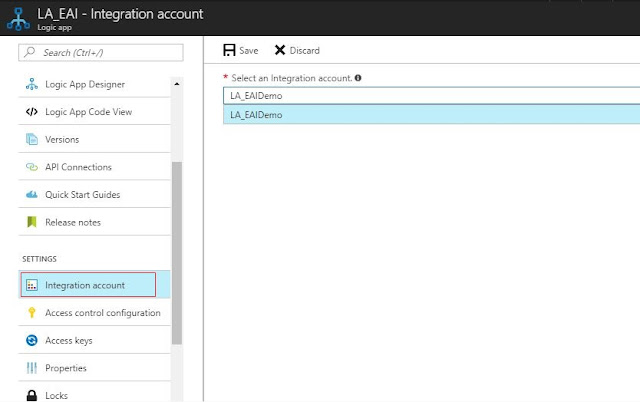
First thing to do is after creating
and before designing, we need to link the integration Account in order to use
schemas and map (you can link it later too but you will get error while you
look for schemas or map)
The workflow is – Pick flat file
from on prem folder, decode it using Flat file decoder, validate it against the
flat file schema, transform the file and
save it to another on-prem folder .
Configure the File System connector to trigger the logic app when new file is created in folder after every one minute, followed by action to fetch the content of file. Read Getting Started with Logic Apps - File Routing
Next Action is to add XML Validation, use Body of previous step and select the schema to validate against - Trip_FF
Now we have valid decoded Flat file which needs to be transformed to expected XML, add Transform XML action, select the Body from previous step (here you will see two Body select the one related to Flat File Decoding. Read Required property 'content' expects a value but got null. Path ''.'
Add new Action and search for Flat file decoding, use the File content from previous step and select the flat file schema uploaded earlier in Integration Account Trip_FF
Next Action is to add XML Validation, use Body of previous step and select the schema to validate against - Trip_FF
Now we have valid decoded Flat file which needs to be transformed to expected XML, add Transform XML action, select the Body from previous step (here you will see two Body select the one related to Flat File Decoding. Read Required property 'content' expects a value but got null. Path ''.'
The final step is to save the above transformed file to destination location, add Create File action, provide the out folder, name and use the content from Transform XML
That's it, final workflow is as below, save it and test.
Testing
And in Out folder I can see the output

If you have questions or suggestions, feel free to do in comments section below !!!
Do share if you find this helpful .......
Knowledge Sharing is Caring !!!!!!
Learn More about Logic App
- How to configure Logic App Standard workflow behind Azure APIM
- How to Query Azure Table storage from Logic App | How to filter results of Azure Table storage from Logic App
- Understanding expressions in Logic Apps | Frequently used expressions in Logic Apps | What is expressions in Logic App
- How to use Logic app Run History | How to troubleshoot Logic App workflow execution
- Logic App and Slack - Sending messages to slack channel | Logic app and slack integration | Connecting Logic App to Slack channel
- How to access Application settings fields value from Logic app Standard workflow | Using Application settings as configuration store for Logic app standard workflow
- Developing Logic app standard workflow which uses Map locally and deploying to Azure
- Developing Logic App Standard Workflow Using Visual Studio Code | Create Logic App Standard Workflow Using Visual Studio Code
- Logic App - Xml to Json using Liquid Map | Append in Liquid Map
- How to use Azure Event Grid Custom Topic | Publishing and Subscribing from Azure Event Grid Custom Topic using Logic App
- Using Azure Storage Account Table as Config Store for Logic Apps | How to read and write from Logic App to Azure Storage Account Table
- Get Logic App Name in Logic App
- Difference between Logic App Consumption and Logic App Standard
- Getting Started with Logic App Standard | Overview of Logic App Standard | Basics of Logic App Standard
- How to find count of Logic App executions using Azure Portal
- Azure Functions vs Azure Logic App | Difference between Azure Functions and Azure Logic App
- Getting started with Logic App : Liquid Map | Using Liquid template in Logic app
- How to get actual error message of Scope in Logic App | Exception Handling in Logic app
- Interview questions and answers on Logic Apps | Interview questions for azure logic app developers
- How to execute Stored Procedure in Logic App | How to connect to SQL in Logic App
- How to get current date in logic app | How to format date time in Logic App
- BizTalk Developer getting started with Logic App
- Getting Started with Logic Apps - Fundamentals
- Getting Started with Logic Apps - Enterprise Application Integration
- Getting Started with Logic Apps - AS2
- Getting Started with Logic Apps - EDI X12 Fundamentals
- Getting Started with Logic Apps - XML to EDI X12
- Getting Started with Logic Apps - EDI X12 to XML
- Getting Started with Logic Apps - What happened to the Request?
- Inserting Multiple Records In On Prem SQL Using Logic App
- Inserting data in On Premises SQL Database using Logic Apps
- Installing and Configuring On Premises Data Gateway - By adding user to Active Directory
- XML Batching(Aggregation) in Logic App
- Batching(Aggregating) messages in Logic App
- Debatching(Splitting) JSON Message in Logic Apps - ForEach and SplitOn
- Debatching(Splitting) XML Message in Logic Apps - ForEach and SplitOn
- Securing Logic App with Azure Active Directory authentication
- Removing ns0: prefix from xml output from BizTalk/Logic app XSLT map
- Using Managed Identity in Logic Apps for Calling Active Directory Secured Function App
- Logic Apps : Fetching ISA and GS Segment Values From Interchange Envelope and Mapping
- Logic Apps : For Each Inside a For Each - Fetching values from field in an array inside an array


Thanks Mahesh, how simply you explained it :)
ReplyDelete